Saturday, February 27, 2010

Microwave chocolate cake

I am currently sadly lacking in my ability to use the stove or the oven, due to a leak in the hose that brings gas from the main pipe to the range. It's not like this has really impaired my ability to eat --- or even my ability to cook, given that I've also got a microwave, a toaster oven, a rice cooker, and an electric wok. Not to mention that I could always call for pizza or walk a block to the local pub. So while it might be a little tough to bake bread, there's no sense in which my lack of a stove/oven is really a problem.

But it did get me thinking about alternate cooking methods. I've never been a big fan of microwaves, although I know most people swear by them. Yes, they're good for defrosting leftovers, but anything you can do with a microwave you can do on the stove, and probably better (cf. popcorn, baked potatoes). Without use of the stove, though, I was wondering whether I could discover any recipes that might serve to make me a bit less ambivalent about the microwave.

And I did: microwave chocolate cake. (See also here and here, but the recipe I used is the most chocolaty, natch.)

I admit, I was skeptical. Really, really skeptical. But, my friends, I have made the cake and I have seen the light. The light of chocolate cake.

The ingredients:


The recipe recommends using an extra large coffee mug, which I didn't have, so I worked with my tall cappuccino mug. (See the "D" on the side? That means that whatever is in there is MINE, and you can't have any.)

As recommended, I sifted the dry ingredients together and added them to the mug. I've never bothered much with sifting flour, but it's definitely a necessity for the cocoa powder, which clumps like crazy.

The recipe calls for melting chocolate chips with butter. I didn't have any chocolate chips on hand, but what I did have was leftover chocolate fondue from a dinner party a few weeks ago (thanks, Liz!). Since this already had some oil in it (as well as some bourbon, a nice addition), I used only 2 tablespoons of butter instead of the 3 that the recipe calls for.

I popped this in the microwave to melt it, then added the egg and the soy milk after it had cooled a bit, so as not to scramble the egg.

This whole mess of wet ingredients is supposed to be poured right into the mug to be combined with the dry ingredients already in there. I knew this was a bad idea at the time, and I was right. Although I admire the sentiment to use as few bowls as possible, I couldn't get the batter entirely mixed at the bottom of the mug, and ended up with some unincorporated flour stuck to the bottom of the cake. Guess I should learn to trust my instincts.

The finished batter was about the consistency of a very thick pancake batter and filled the mug most of the way to the top.


It cooked on high for 3 minutes, and started to rise out of the top of the mug about halfway through:


But it held together well enough not to spill over the sides, almost like a soufflé, which is surely its culinary ancestor.

It came out of the microwave bubbling hot on top, so I let it set in the mug for a few minutes before extracting it onto a plate.


As you can see, it broke in half while I was trying to wiggle it out of the mug, and the bottom half is showing my poor mixing skills. But the top half was fantastic: rich, moist, and intensely chocolaty. Bonus: When I first started eating it, it was still warm and gooey inside. Yum.

So I will definitely try this again, modifying the mixing method and cooking vessel accordingly. I could probably even make a few of these cakes at once and pass them off as a serious dessert at the next dinner party. Hmmmm...

Saturday, February 20, 2010

Best ever almost-instant ramen noodles

I freely admit to stealing this idea shamelessly from Mark Bittman (pg. 466 of his How to Cook Everything Vegetarian, if you'd like to go straight to the source), but that doesn't stop it from being my new favorite weeknight dinner.

Some relevant backstory: The Chinese grocery store that Michael and I go to always gives us a little gift at the checkout. I guess they've got to get rid of the stuff that's not being sold somehow. Usually this takes the form of packages of individually wrapped "vanilla" wafer cookies (yes, the quotes are intentional). But one time, we got a package of air-dried noodles, which contained eight or so little bricks of the same kind of telephone-cord noodles that come in packages of instant ramen.


Now, I have a serious weak spot for noodles in broth, but have never been able to have regular instant ramen since all of the broth flavorings contain powdered critter bits. The few brands that don't inevitably make up for this fact with loads of MSG and salt, which gives me a frightful headache in addition to f-ing up my circulatory system. But this package of noodles got me thinking: Could I make something similar, without the critter bits and nearly poisonous levels of sodium?

Yes, says Bittman. Here's how:

Soy sauce + ketchup + water. That's it. Bittman calls for 1/4 cup of soy sauce and 2 tablespoons of ketchup in 6 cups of water. I've taken to using a little less water to make the broth more flavorful, but generally these ratios work very nicely.

You could throw in some scallions if you feel like getting fancy, or some of last night's leftovers, or a splash of rice vinegar. A swirl of sesame oil on top is always welcome. Boil up the whole mess, then add the noodles. Cooking time: As long as it takes to boil water on your stove, plus three minutes to cook the noodles. If you'd like to boost the protein quotient, Bittman recommends cracking an egg into the broth. I haven't done this variation yet, but will definitely give it a try next time.

I don't know if this tastes anything like real ramen, or like real instant ramen for that matter, but I don't care --- it's delicious.

Wednesday, February 17, 2010

It's their logic that has the holes

Continuing our series of strange, WTF-inducing signs, here's the hanger cover that accompanied my dry cleaning today:


Seems fairly reasonable at first glance, right? It has all the usual info: the name of the place, the address, which cards they accept, store hours, phone number, disclosure about staples...

Wait, what?

What the heck kind of safety pins are they using? How is it physically possible for a safety pin not to leave a hole, in my garments or otherwise? Are they magical? Or maybe they're imaginary??? Somebody, please, explain this to me.

Monday, February 8, 2010

Winter sunshine

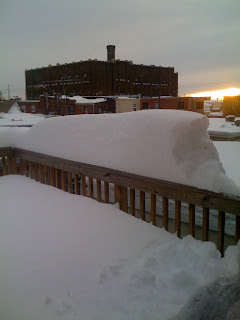
Here's what the back deck looked like yesterday:

The official report from the airport said 28.5 inches of snow, the second-largest snowstorm ever in the city. Nothing to sneeze at. I shoveled the sidewalk, salted the front steps, dug out the car, and came back inside to make one of my favorite mid-winter comfort meals: Meyer lemon risotto.

It's always seemed paradoxical to me that winter is citrus season. I have no excuse for this feeling other than bad logic. See, citrus grows in warm places, which means that it should be growing well when it's warm outside, which means that winter shouldn't be citrus season. Um, QED?

Anyway, we decided to take advantage of the bounty by buying some distinctively northern California treats: Meyer lemons. They're a cross between lemons and oranges, and they were ubiquitous in the San Francisco Bay Area --- in pots, on people's lawns, on the psych department balcony (yes, really). We saw them in the produce section of Whole Foods and decided to pick up a few. (Actually, what really happened was that Michael pouted excessively in the produce section of Whole Foods until I finally gave in and let him buy a few. Sheesh, you'd think I never let him have any fun at all.)

For those of you who know how to make risotto, making Meyer lemon risotto is easy: Just use the juice in place of wine when deglazing the rice, and put in some zest during the last third of the cooking.

For those of you who don't, follow me.

First, we prepped the lemons: I zested the skin off of two of them and squeezed the juice into a bowl.

Meanwhile, Michael chopped shallots and then sweated them in butter and a pinch of salt until they softened.

Man, shallots in butter...that is just about the best smell ever.

After the shallots turned translucent, we stirred in a cup of Arborio rice and let that turn translucent as well. Then we added the lemon juice to deglaze the pan. Normally, this step is done with wine, but anything flavorful and acidic will do the job. We also put in a bit of orange juice at this point --- cheating a bit, I know, but using only the Meyer lemon juice would have made the base too sour. Orange juice brings out the sweetness of the Meyer lemons without masking their citrusy flavor.

We kept a pot of veggie broth simmering on a second burner, and started spooning it in one ladle-ful at a time as soon as the rice had a chance to absorb some of the juice. From here on out, it was pretty easy to keep an eye on things and to add more liquid whenever the rice had absorbed most of the previous addition. One cup of rice will take about four cups of liquid, give or take.

About two-thirds of the way through the cooking, we added the zest and a handful of frozen peas to accentuate the springiness of the dish. Obviously, I would have preferred fresh peas, but those are definitely not in season.

While Michael was stirring it up at the stove, I peeled off the skin of a fresh Meyer lemon and sliced it thinly for a garnish:

When the risotto was almost done, we stirred in some chopped parsley, a handful of grated Parmesan cheese, and a good-sized knob of butter. Hey, I said this was comfort food!

The whole thing took about 45 minutes, top to bottom, maybe a bit less. I'm not sure it's the sort of thing that I'd try to put on the table for dinner every night, but it was definitely worth the effort. The Meyer lemons filled the kitchen with a sweet and fresh perfume, and the peas added a little "pop" to the creamy risotto. Topped with some freshly-shaved Parmesan and the sliced zest, this was definitely a little ray of winter sunshine.